The bespoke software, myDiscoveryResponses, is designed for the production and editing of discovery responses. Using the software, you can load discovery request pdf's of type: Requests for Admissions (RFA), Demands for Production (RFP), Special Interrogatories (SPROG), Form Interrogatories (FROG). These are loaded using natural language processing and OCR techniques, in order to extract the correct requests and file details from the pdf files. Once loaded, you can move between each request and check off objections; in addition to adding custom responses. When these responses have been created, the file can then be exported as a response word document (DOCX), or saved for future editing as a .discovery file.
Installation
To install myDiscoveryResponses:
1. Download the most recent installer.2. Run the Installer.
Download myDiscoveryResponses installer for Windows x64
DownloadTo update myDiscoveryResponses:
1. Navigate to Options -> Settings -> Updates -> Check for Updates2. If an update is available then it will prompt you to download it.
3. Once downloaded, the myDiscoveryResponses installer should open and the software will close.
4. Run the Installer.
*Note that this will keep the saved software configuration.
User Interface

The main window is comprised of the Requests panel, Response panel and the Objections panel. Each of these panels can be broken down further into their subcomponents.
Requests Panel
Clients
Each open client/editor is shown here, they can be swapped between by left clicking on them. You can drag a file from one client name onto another to move it between them.Files
All of the files for the current client are shown here and can be swapped between by left clicking on them. When all of the requests in a file have been submitted then the file will go green, indicating that it is complete and ready for exporting.Requests
All of the requests for the current file are shown here and can be swapped between by left clicking them. The colour of each one reflects their current state: WHITE - Unchanged, GREY - Edited, GREEN - Submitted and RED - Check with Clients.Response Panel
Request
The currently selected request is shown here, it cannot be edited.Objections
The selected objections will be formatted in this box, if the objection has text inputs then these will also be added. You can edit the text in this box if custom objections are required.Response
The response area contains different entries depending on the particular type of discovery request. Text inserted into here my also add additional text to the objections box.Objections Panel
The objection panel contains a list of the saved objections. You can left-click to toggle and objection for the current request or right-click to edit the additional text options within it.
Navigation Bar
The navigation bar contains the actions:
File -> New Window Opens a new empty window
File -> New Client Creates a new client with a custom name
File -> Open Recent Shows recently edited discovery files
File -> Open File Opens a PDF or discovery file
File -> Open Folder Opens all available files within a folder (not including subdirectories)
File -> Add blank FROG Creates a blank FROG file (all requests enabled)
File -> Load Client Feedback Load client feedback from a DOCX file created by this program
File -> Save Client Save a client as a discovery file
File -> Save Client As Save a client as a new discovery file
File -> Export File as DOCX Export the current file as a word document
File -> Export Client as DOCX Export all of the files under the current client
File -> Export Check With Client Export the current file but only requests marked as 'check with client'
File -> Preview DOCX Opens a window with a preview of the current file
File -> Delete File Deletes the currently selected file
File -> Close Client Closes the currently selected client
File -> Check For Updates Checks online for an update to myDiscoveryResponses
File -> Exit Close the current window
Options -> Firm Details Allows editing of the firms detailed, which are added to the DOCX exports
Options -> Objections Opens the objections editor window
Options -> Shortcuts Opens the shortcuts editor window
Options -> Settings Opens the software settings window
Options -> User Guide Opens this documentation page in the default browser
File Details Allows editing of the current files details
Undo Undo the last action
Redo Redo the last undone action
Save Save a client as a discovery file
Preview Previews the full text response
Copy Previous Copy the objections from the previous request
Clear Fully clear a request
Fullscreen Toggle the software being fullscreen or maximized
Discovery Requests
RFPs Demands for Production
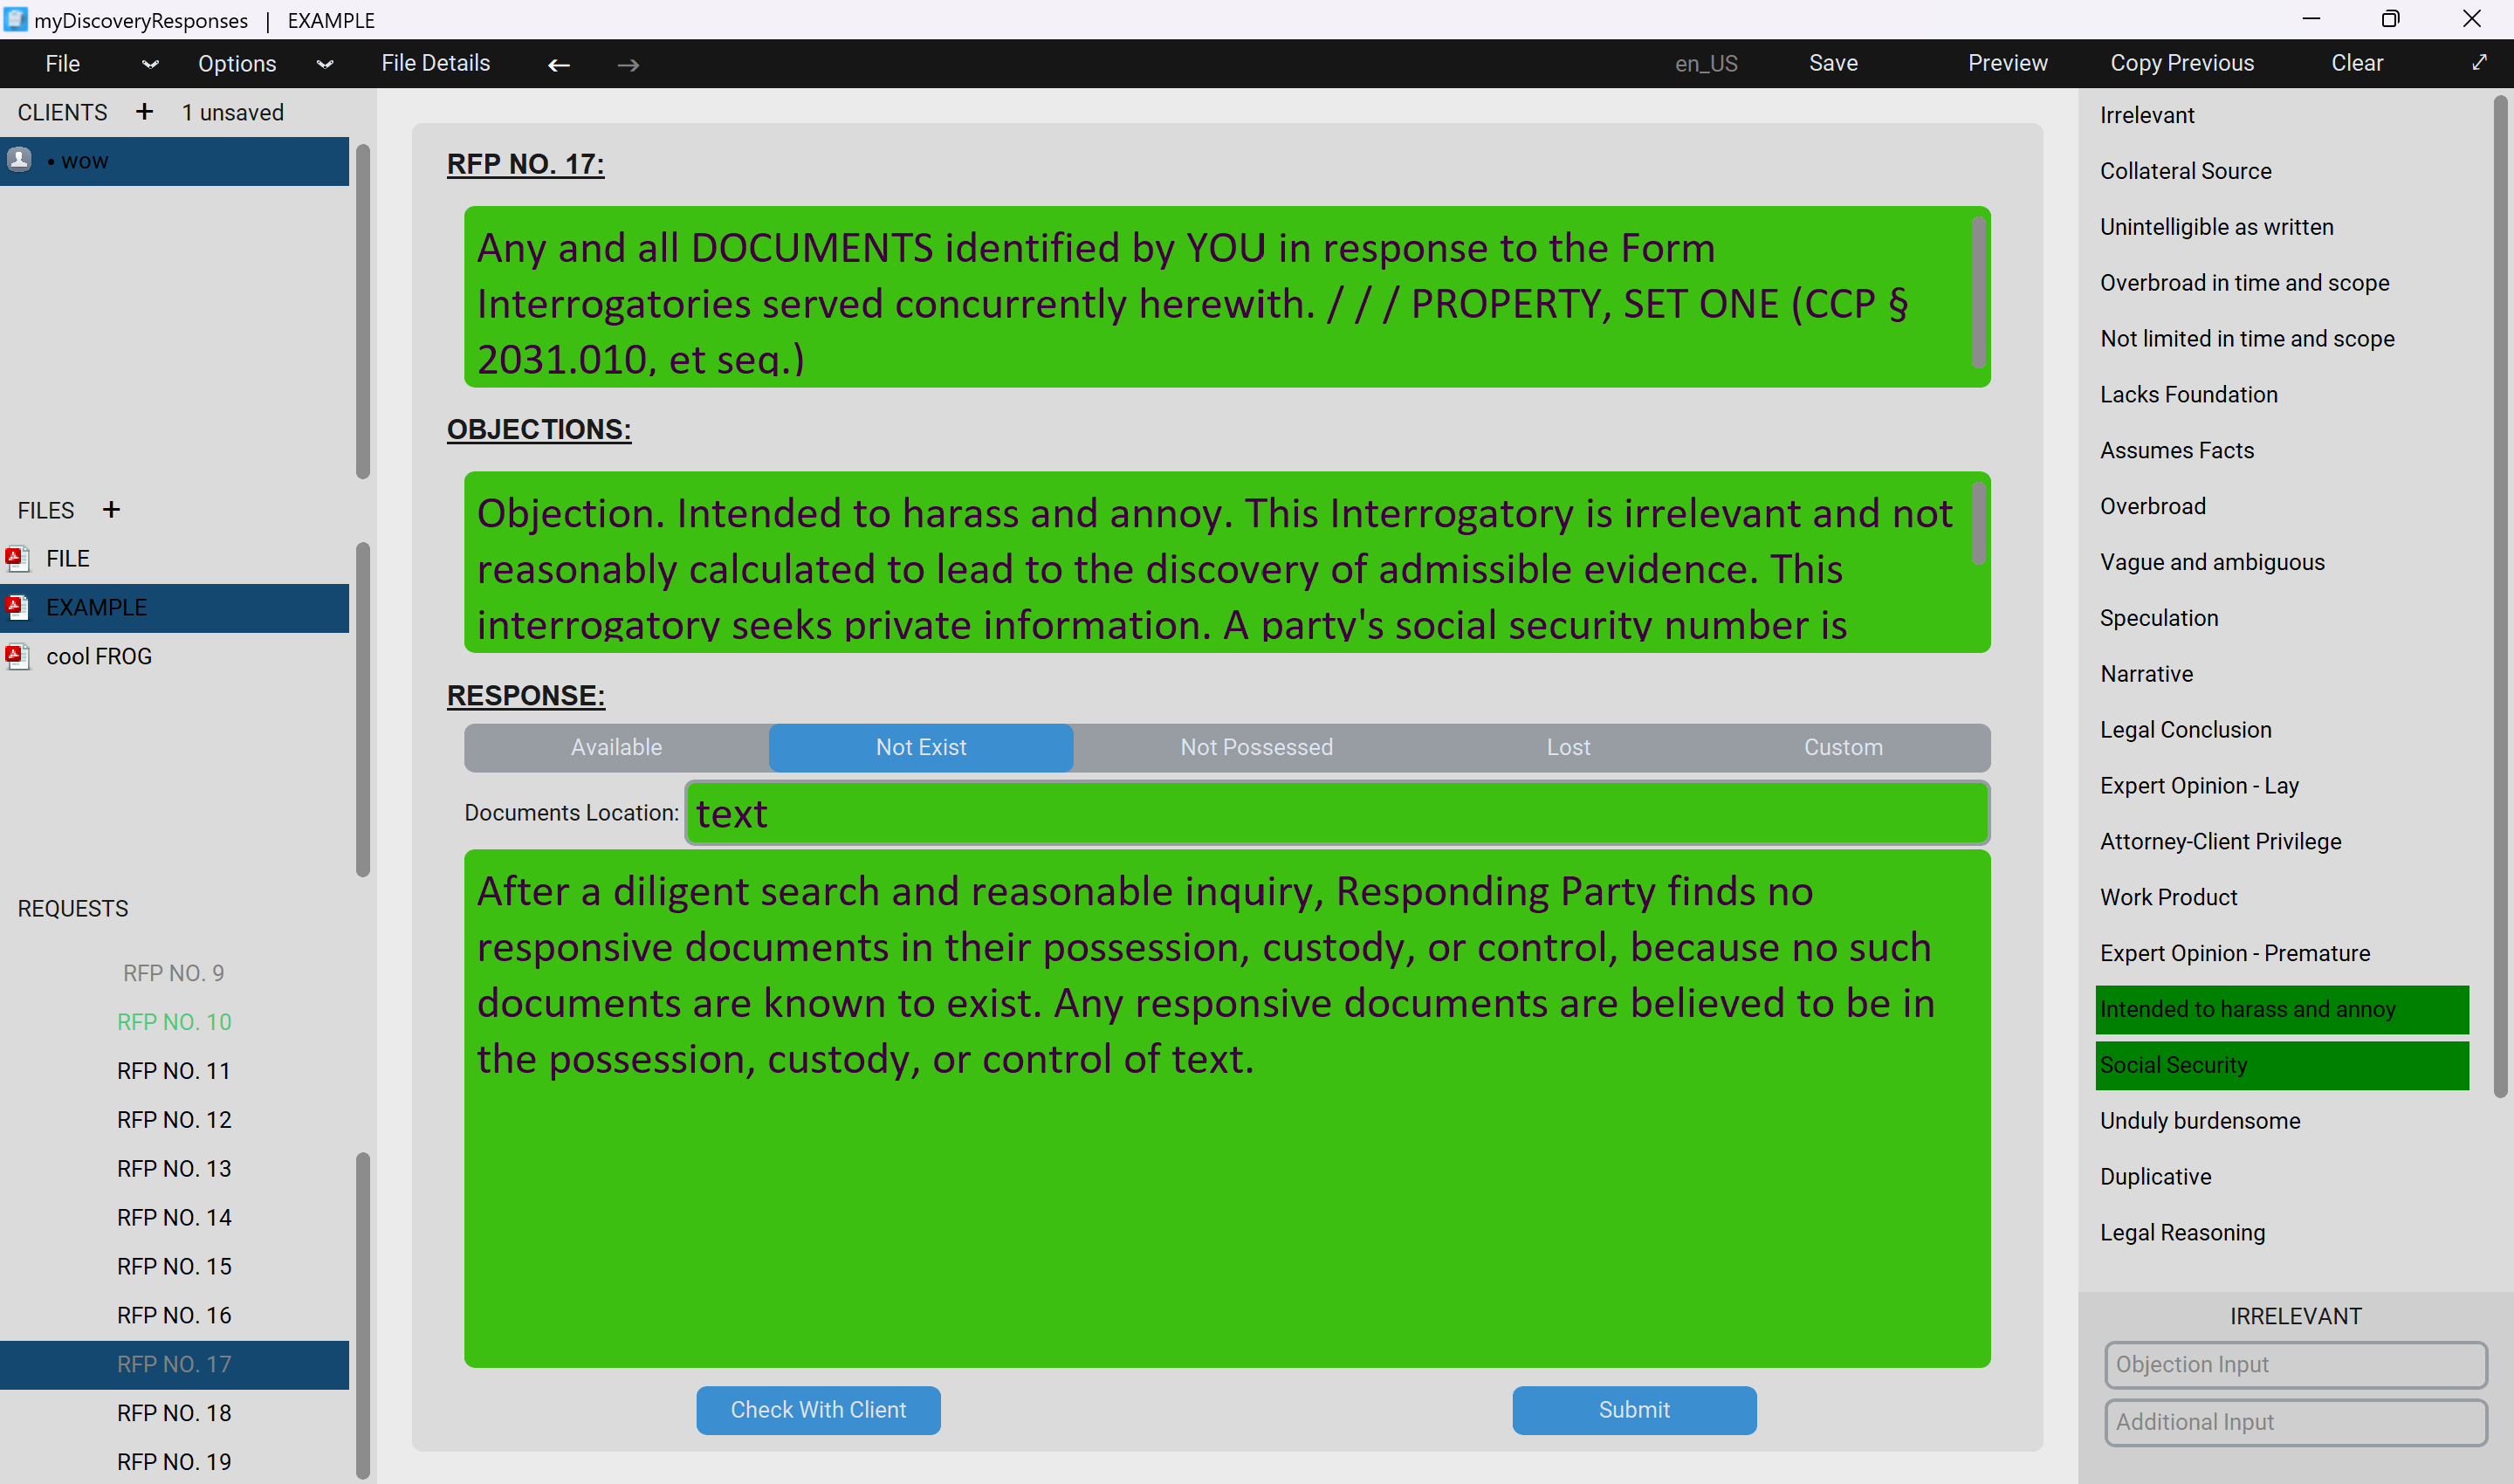
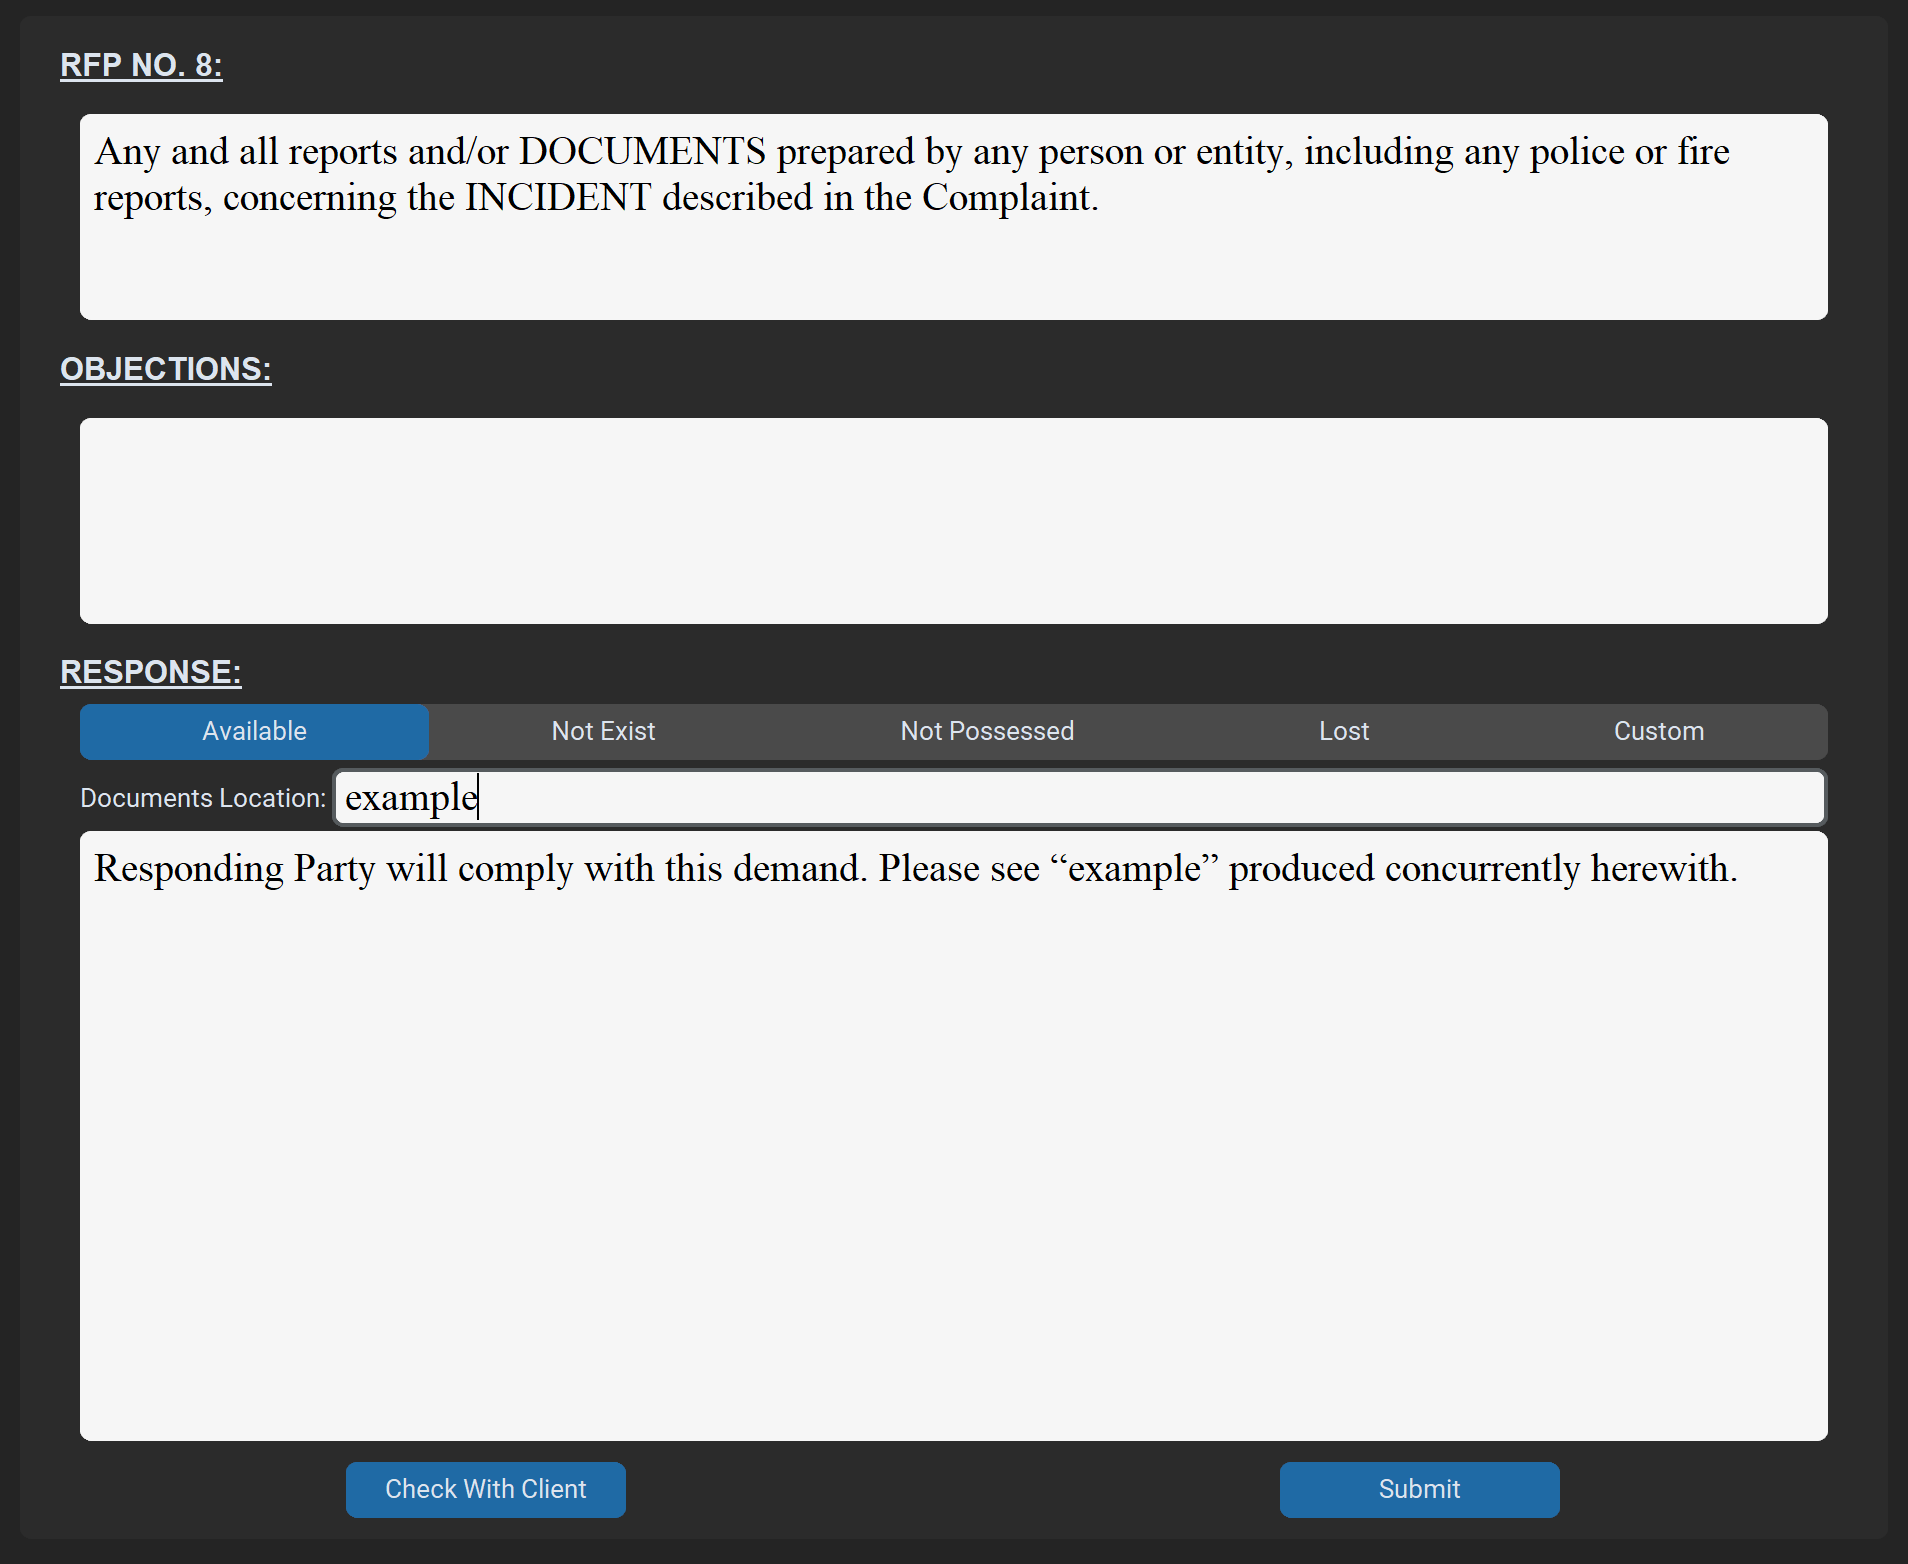
RFPs have four set responses and the option to type a custom response. If a document location is given for the request then the set responses will adjust accordingly.
Available - Responding Party will comply with this demand. Please see “location” produced concurrently herewith.
Exist - After a diligent search and reasonable inquiry, Responding Party finds no responsive documents in their possession, custody, or control, because no such documents are known to exist. Any responsive documents are believed to be in the possession, custody, or control of location.
Not Possessed - After a diligent search and reasonable inquiry, Responding Party finds no responsive documents in their possession, custody, or control, because no such documents have ever been in the possession, custody, or control of Responding Party. Any responsive documents are believed to be in the possession, custody, or control of location.
Lost - After a diligent search and reasonable inquiry, Responding Party finds no responsive documents in their possession, custody, or control, any such documents have been destroyed, lost, misplaced or stolen. Any responsive documents are believed to be in the possession, custody, or control of location.
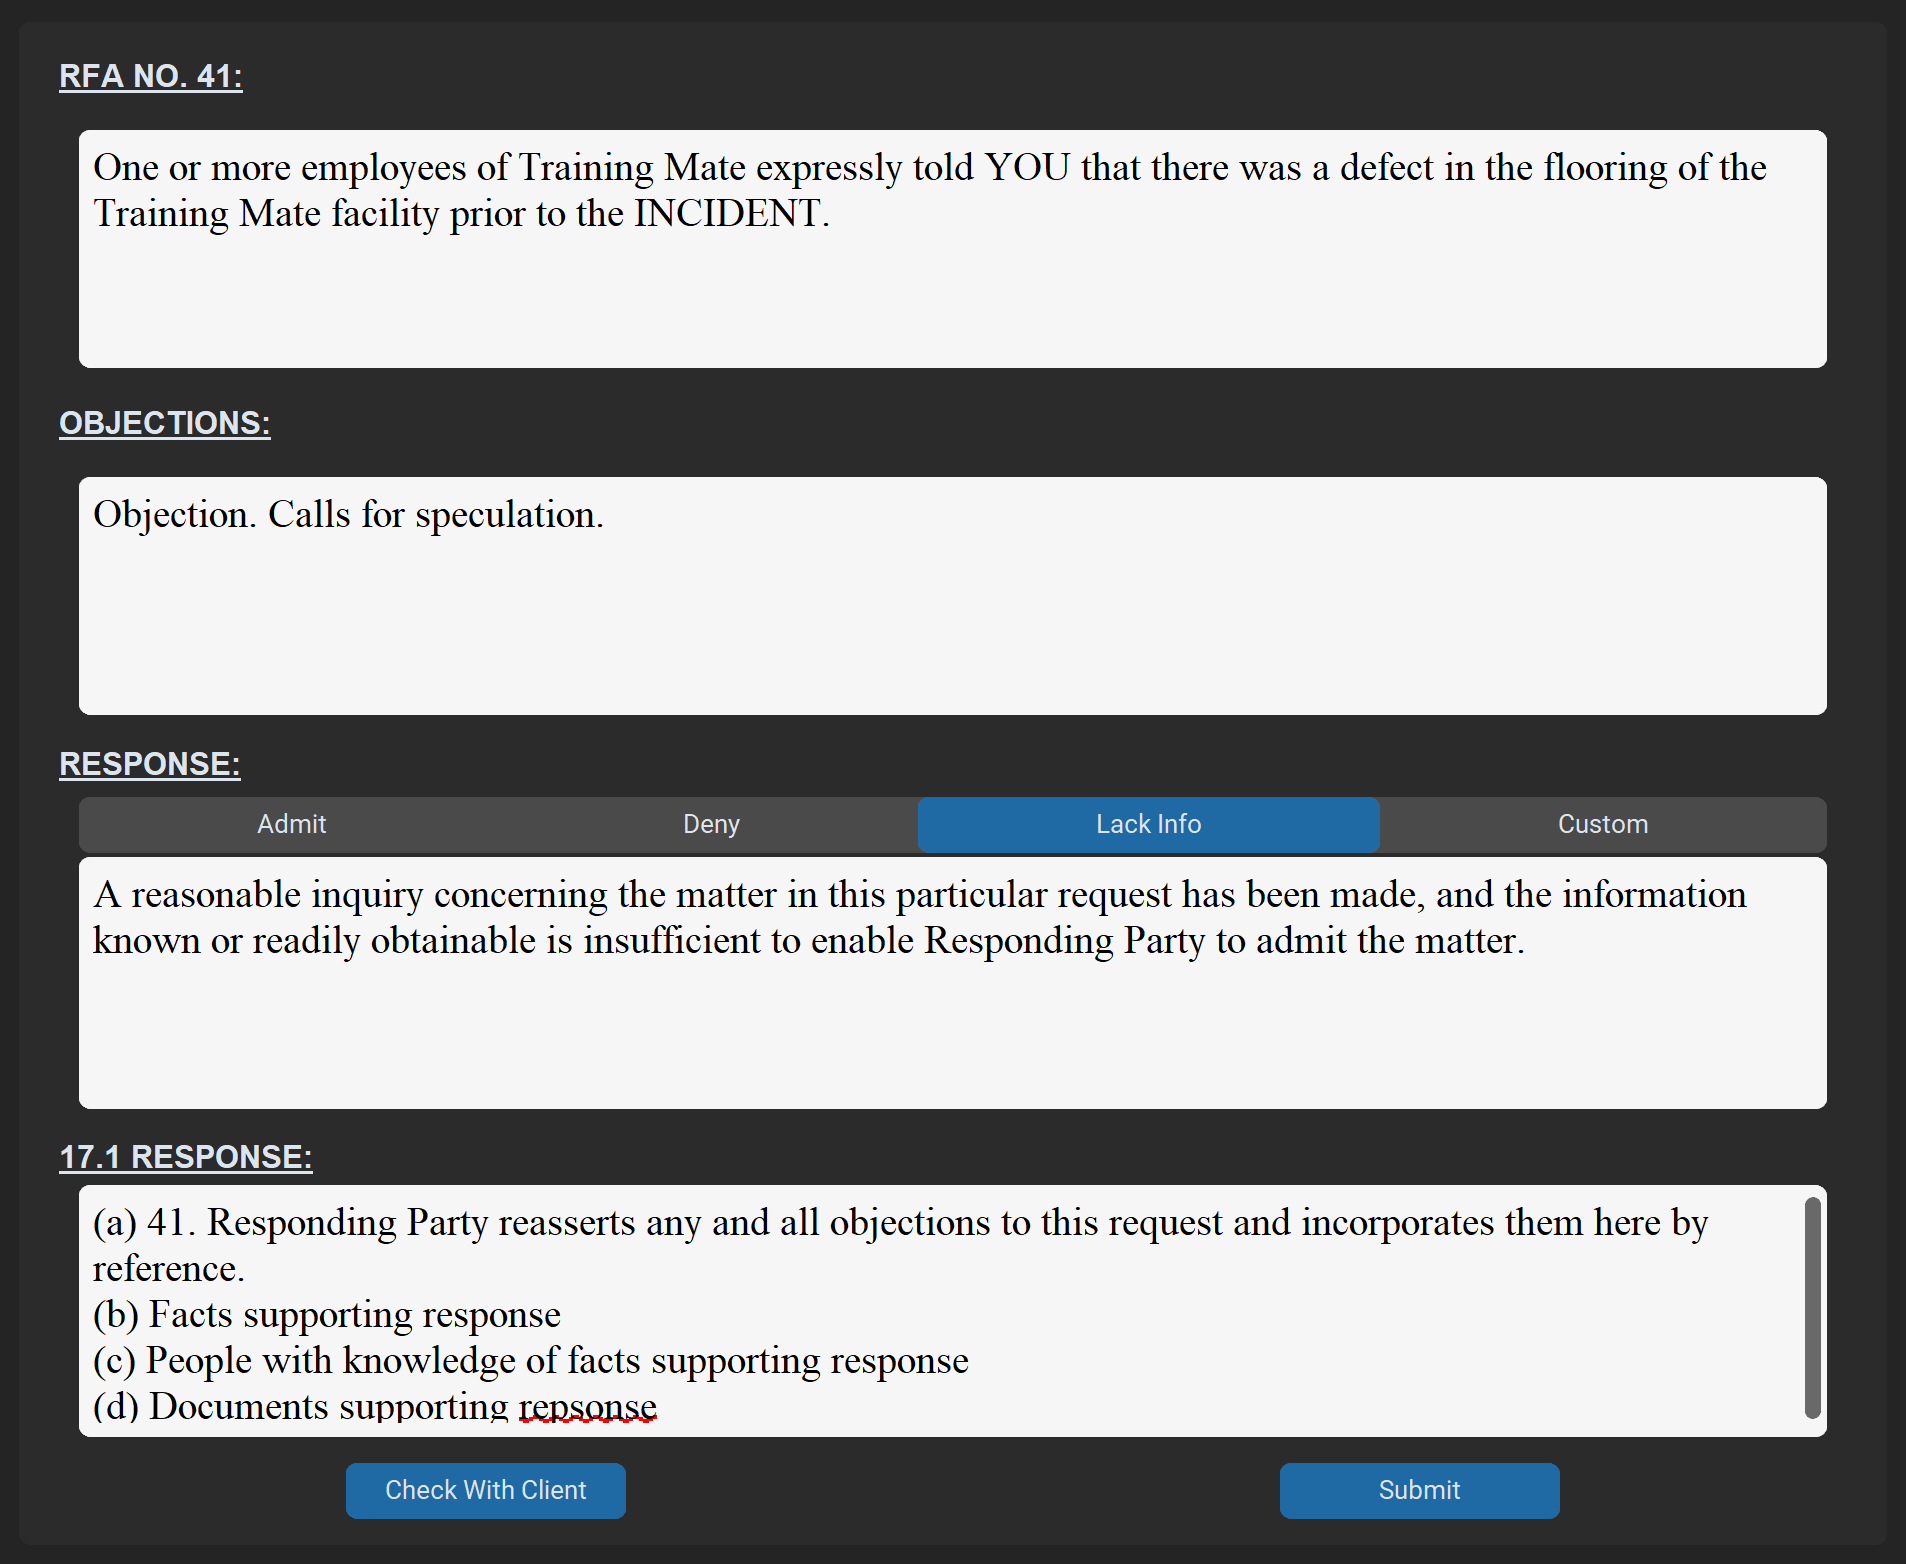
RFAs Requests for Admissions
RFAs have three set responses and the option to type a custom response. Each also has an additional entry called the '17.1 Response', when a request is submitted and the response is NOT Admit, this 17.1 response will automatically be inserted into the 17.1 request of any available FROGs.
Admit - Admit
Deny - Deny
Lack Info - A reasonable inquiry concerning the matter in this particular request has been made, and the information known or readily obtainable is insufficient to enable Responding Party to admit the matter.
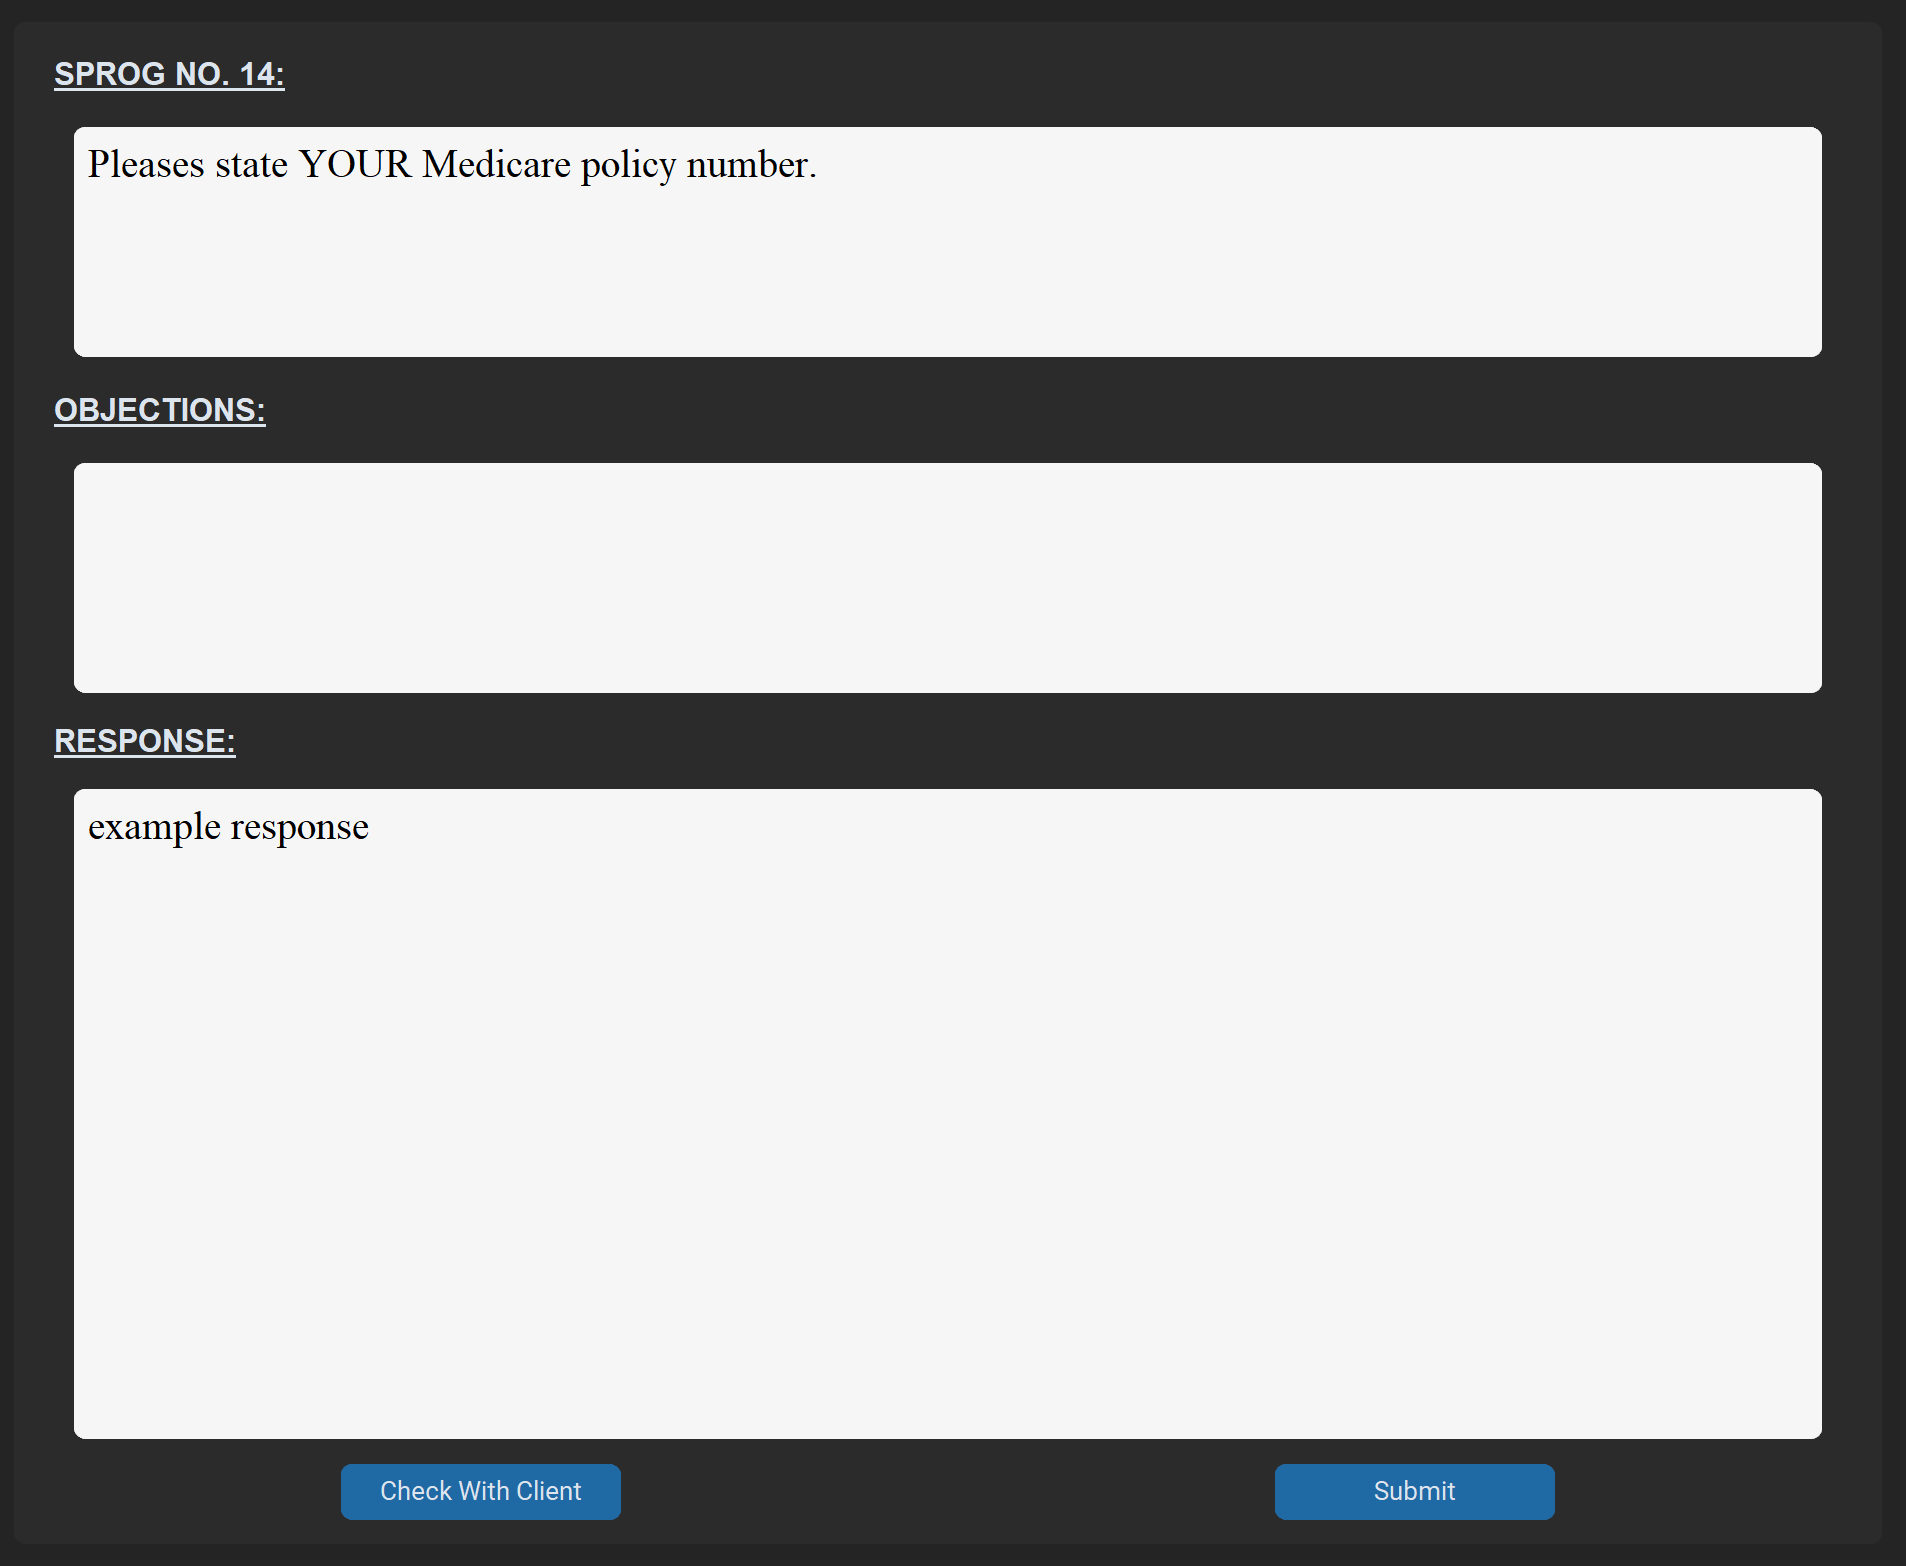
SPROGs Special Interrogatories and FROGs Form Interrogatories
SPROGs and FROGs do not have set options within the software. Rather enter your own custom response when required. Note that for the 17.1 FROGs, submitted RFAs will add their 17.1 response into the response of all file FROGs automatically.
Getting Started
Reading Files
To read a pdf file we use several natural language processing (NLP) and optical character recognition (OCR) techniques. Once we have created or opened a client, a file can be loaded into it. The standard file reading procedure searches through the pdf file and identifies possible request headings, once these are found correctly then the numbered requests will be returned. For FROGs, a more advanced method is used in which we scan the file and identify which FROGs have been checked off. You can also add a blank FROG which contains all of the available form interrogatories.
A client can be saved for later editing as a custom .discovery file type. Selecting one of these files on windows will open it in myDiscoveryResponses as the software uses this as the default file type. Once you have created the responses for a file you can then move onto exporting them.
Exporting Files
We can export files as word documents (.DOCX) in a number of ways. We can export a single file, export a whole client and export client feedback. Exporting a file inserts all of the file details, requests, objections and responses into an appropriate DOCX file template which can then be edited further if needed. We can also export only the submitted requests by turning on the option Settings -> General -> Export only submitted responses.
Using Client Feedback
Client feedback can be loaded into the program as long as the original word doc was exported from myDiscoveryResponses (this is because it requires a specific word document format). If you load client feedback into a file then it will fill all of the corresponding request numbers with the clients filled out feedback. This system makes it easy to send only the needed requests to the client and import the responses straight back into the software.
Shortcuts
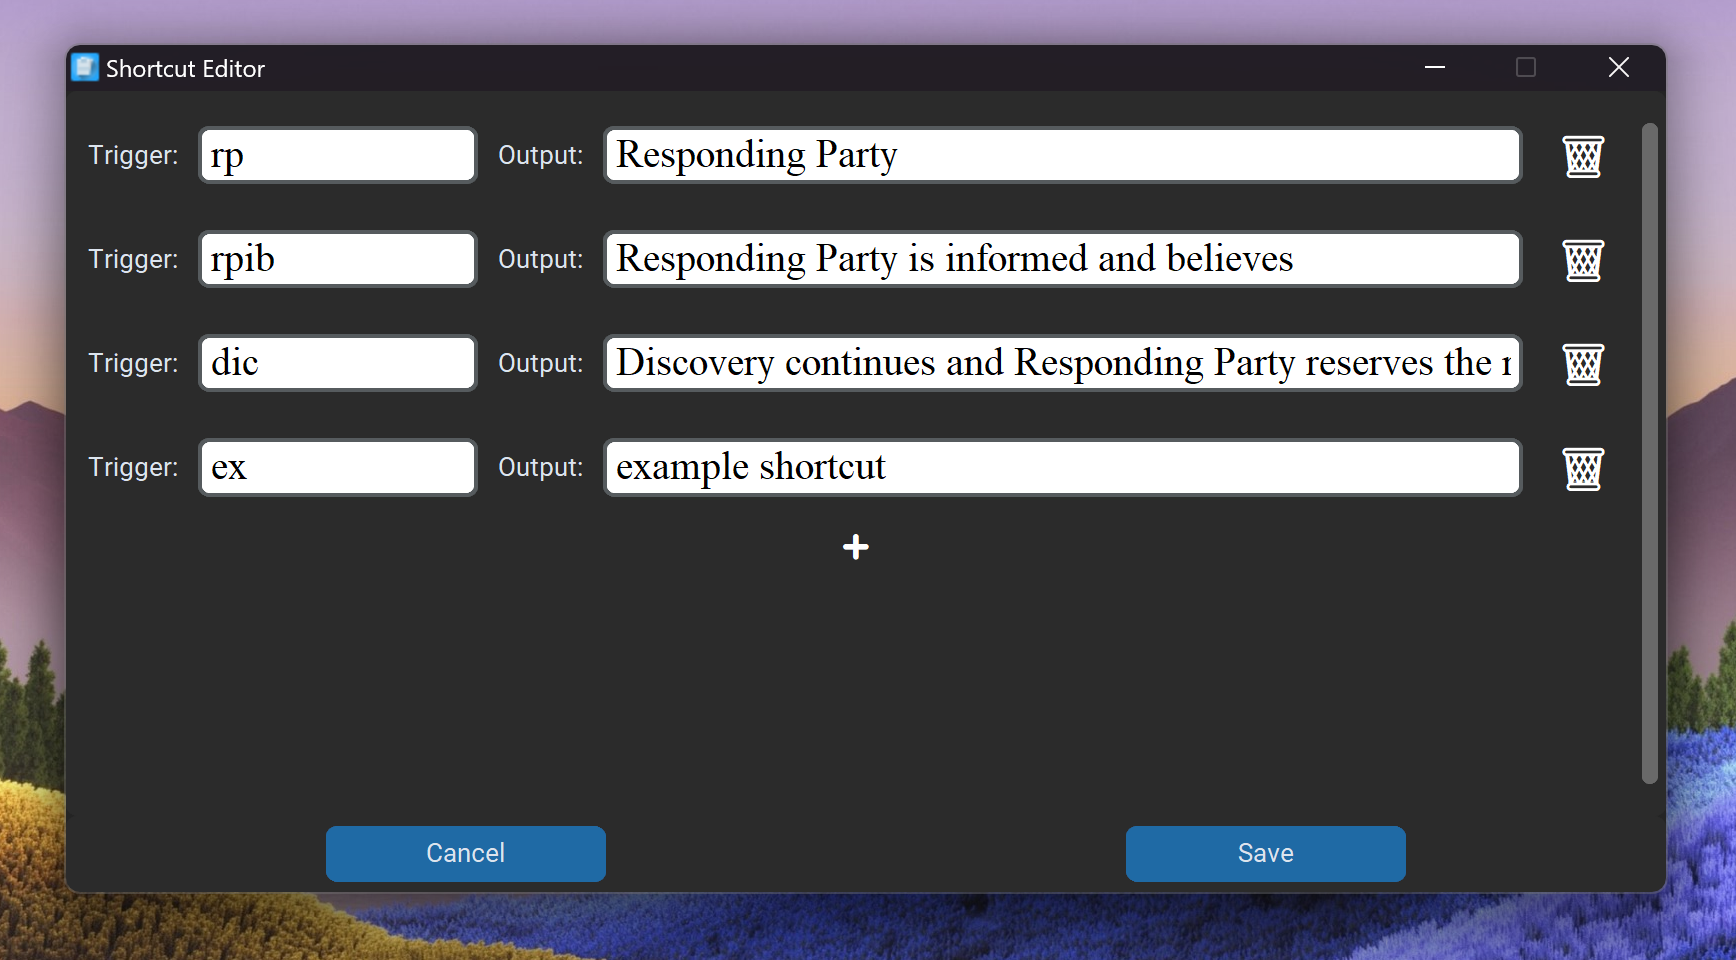
Shortcuts allow for faster typing of repeated phrases. A trigger is a unique text code corresponding to an output value. When a trigger is typed and enter is pressed, the trigger will then be removed and the output will be inserted in its place. The shortcut editor (shown on the left) allows you to add more custom shortcuts as needed into the software. You can also delete these by clicking the adjacent trash cans.
Hotkeys
Within myDiscoveryResponses there is a number of set hotkeys designed to speed up the process of creating responses, these hotkeys are:
Up-Arrow Move up a request
Down-Arrow Move down a request
Enter Submit a request
Escape Escape a text box
Ctrl+N Create a new client
Ctrl+O Open a file
Ctrl+F Open a folder
Ctrl+S Save current client
Ctrl+E Move up a request
Ctrl+Z Undo action
Ctrl+Y Redo action
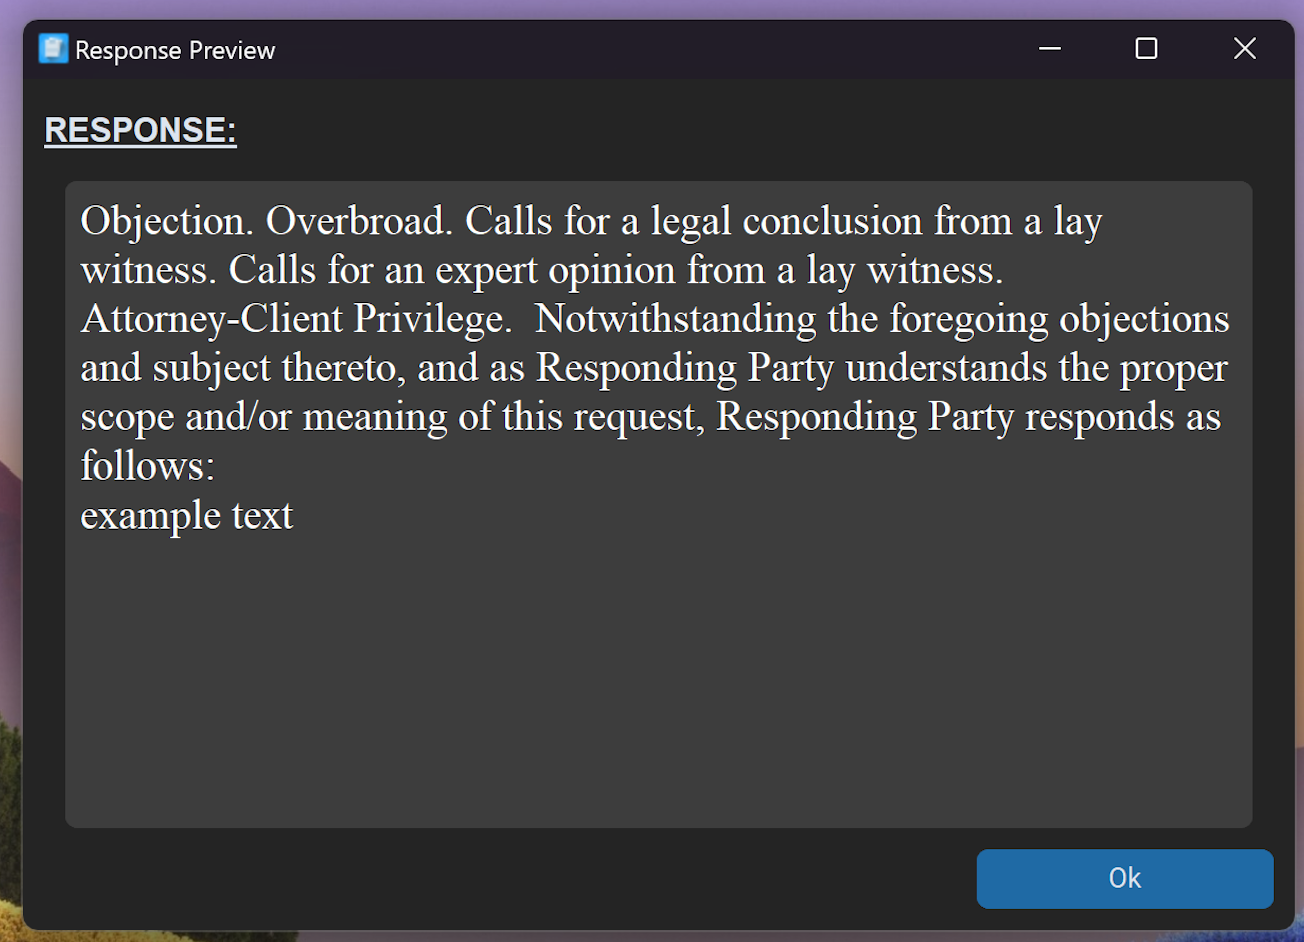
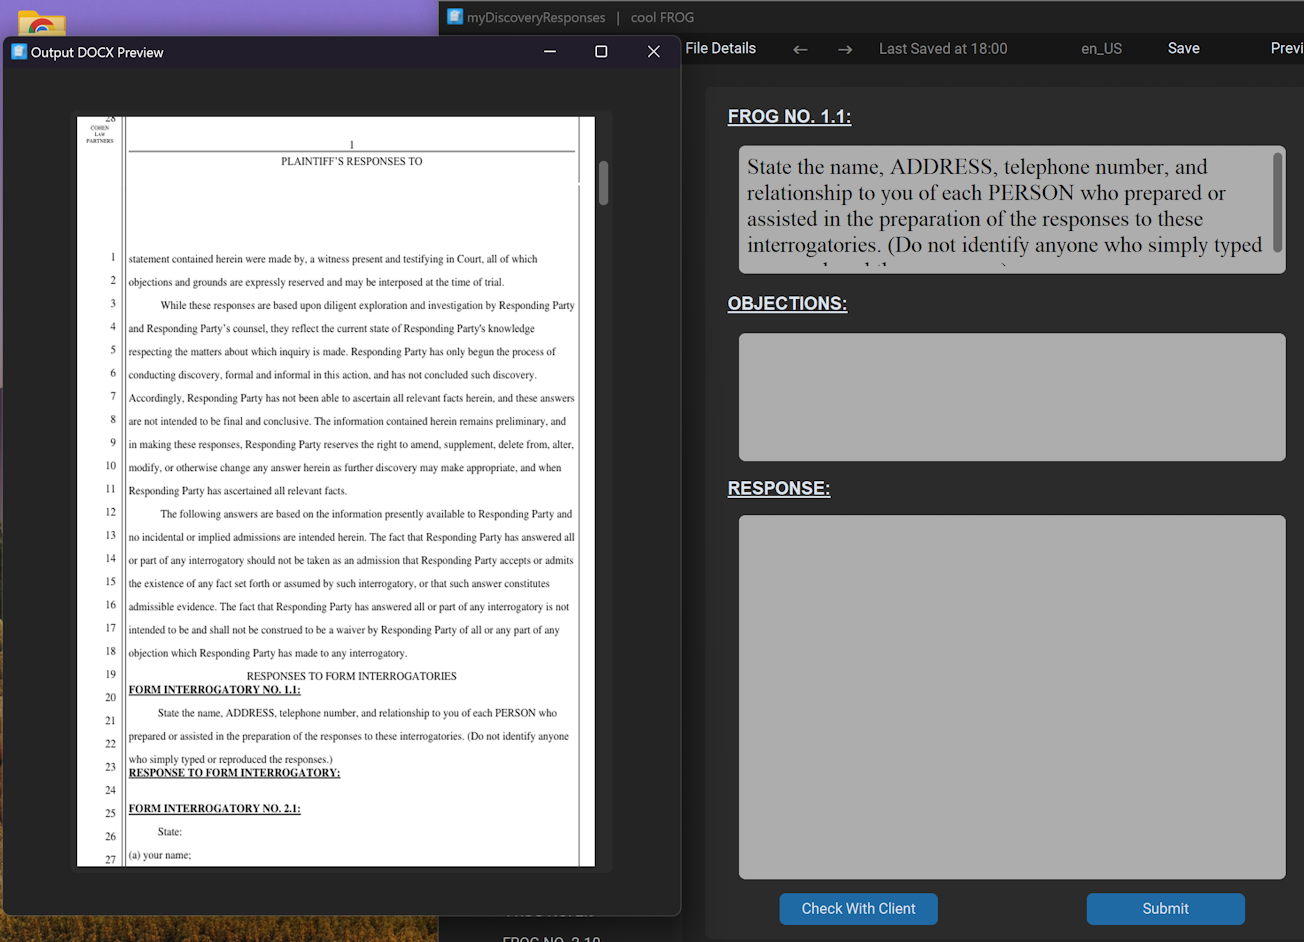
Previews
There are two provided preview options in myDiscoveryResponses. The Response Preview (left) is used to preview the output of a single discovery response. It shows the objections and response formatted identically to how they will be written in the exported file. The Preview DOCX (right) window shows a preview of the full exported DOCX file. This allows you to check the formatting and details of the exported file before actually exporting it. Note that this might not be identical to the final export in microsoft word.
Objections
Objections are listed in the objection panel on the right side of the editor. When left-clicked, that objection will be toggled for the current request (turning green). This objections text will then be added to the requests objection box. When right-clicked, the objection will be selected, allowing you to add list items into the objection if [VAR] is present in the objections text body or additional text body. The final response output for each request will be follow the order Objections, NotWithtanding Text, Response, Additional Text. The Notwithstanding Text is only added if there are objections selected, by default it is:
"Notwithstanding the foregoing objections and subject thereto, Responding Party responds as follows: "
But if an objection is selected with the option Alter Notwithstanding Text, then it is:
"Notwithstanding the foregoing objections and subject thereto, and as Responding Party understands the proper scope and/or meaning of this request, Responding Party responds as follows: "
The software provides a default set of objections to choose from, however these can all be edited using the Objection Editor. The editor allows you to create new objections, edit them and delete them: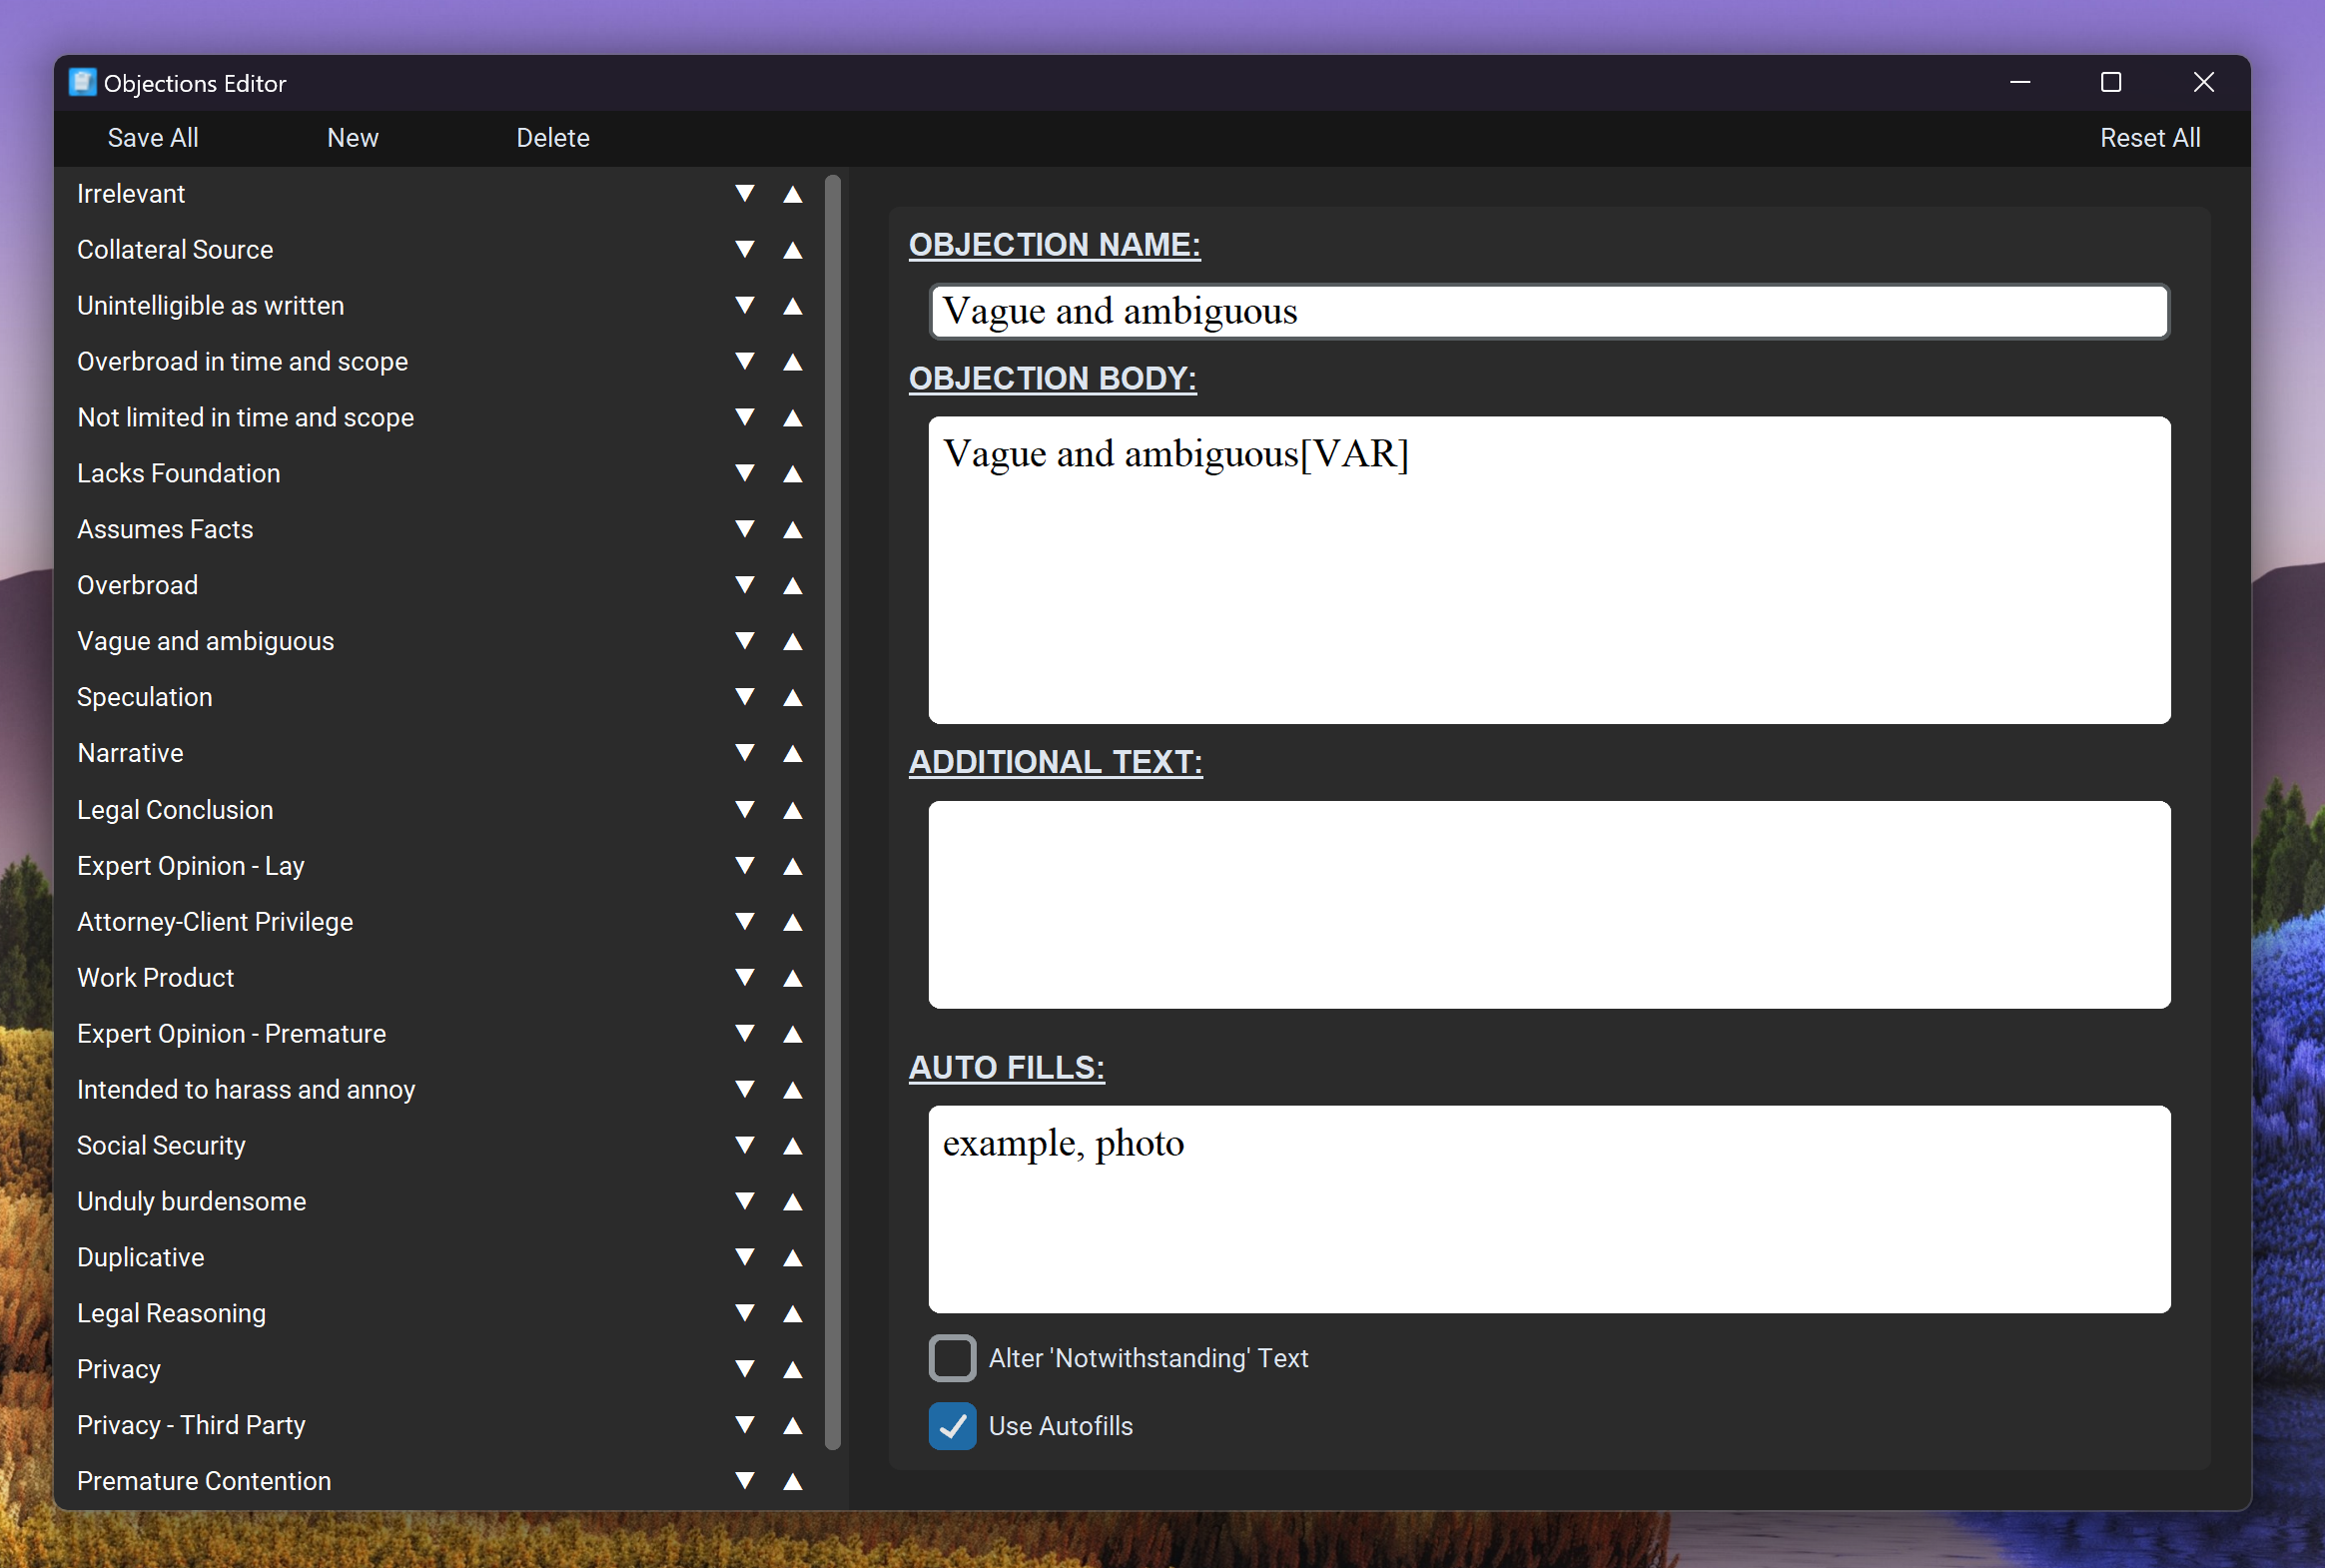
Objection Name - Displayed name of the objection.
Objection Body - Text inserted when the objection is selected. [VAR] is the variable placeholder value , when a list of phrases is typed into the objection option then [VAR] is replaced by these. A list will be formatted as follows: word1,word2,word3 -> as to 'word1', 'word2' and 'word3'.
Additional Text - Text that will appear after the response instead of before. The same rule applies with the [VAR] placeholder.
Auto Fills - A list of terms. When one of these is present in a request when loaded, then this objection will automatically be selected and have the found auto fills typed into the options entry.
Alter 'Notwithstanding' Text - If this is selected then the 'Notwithstanding' text will be changed from:
Use Auto Fills - If this is selected then auto fills will be used.
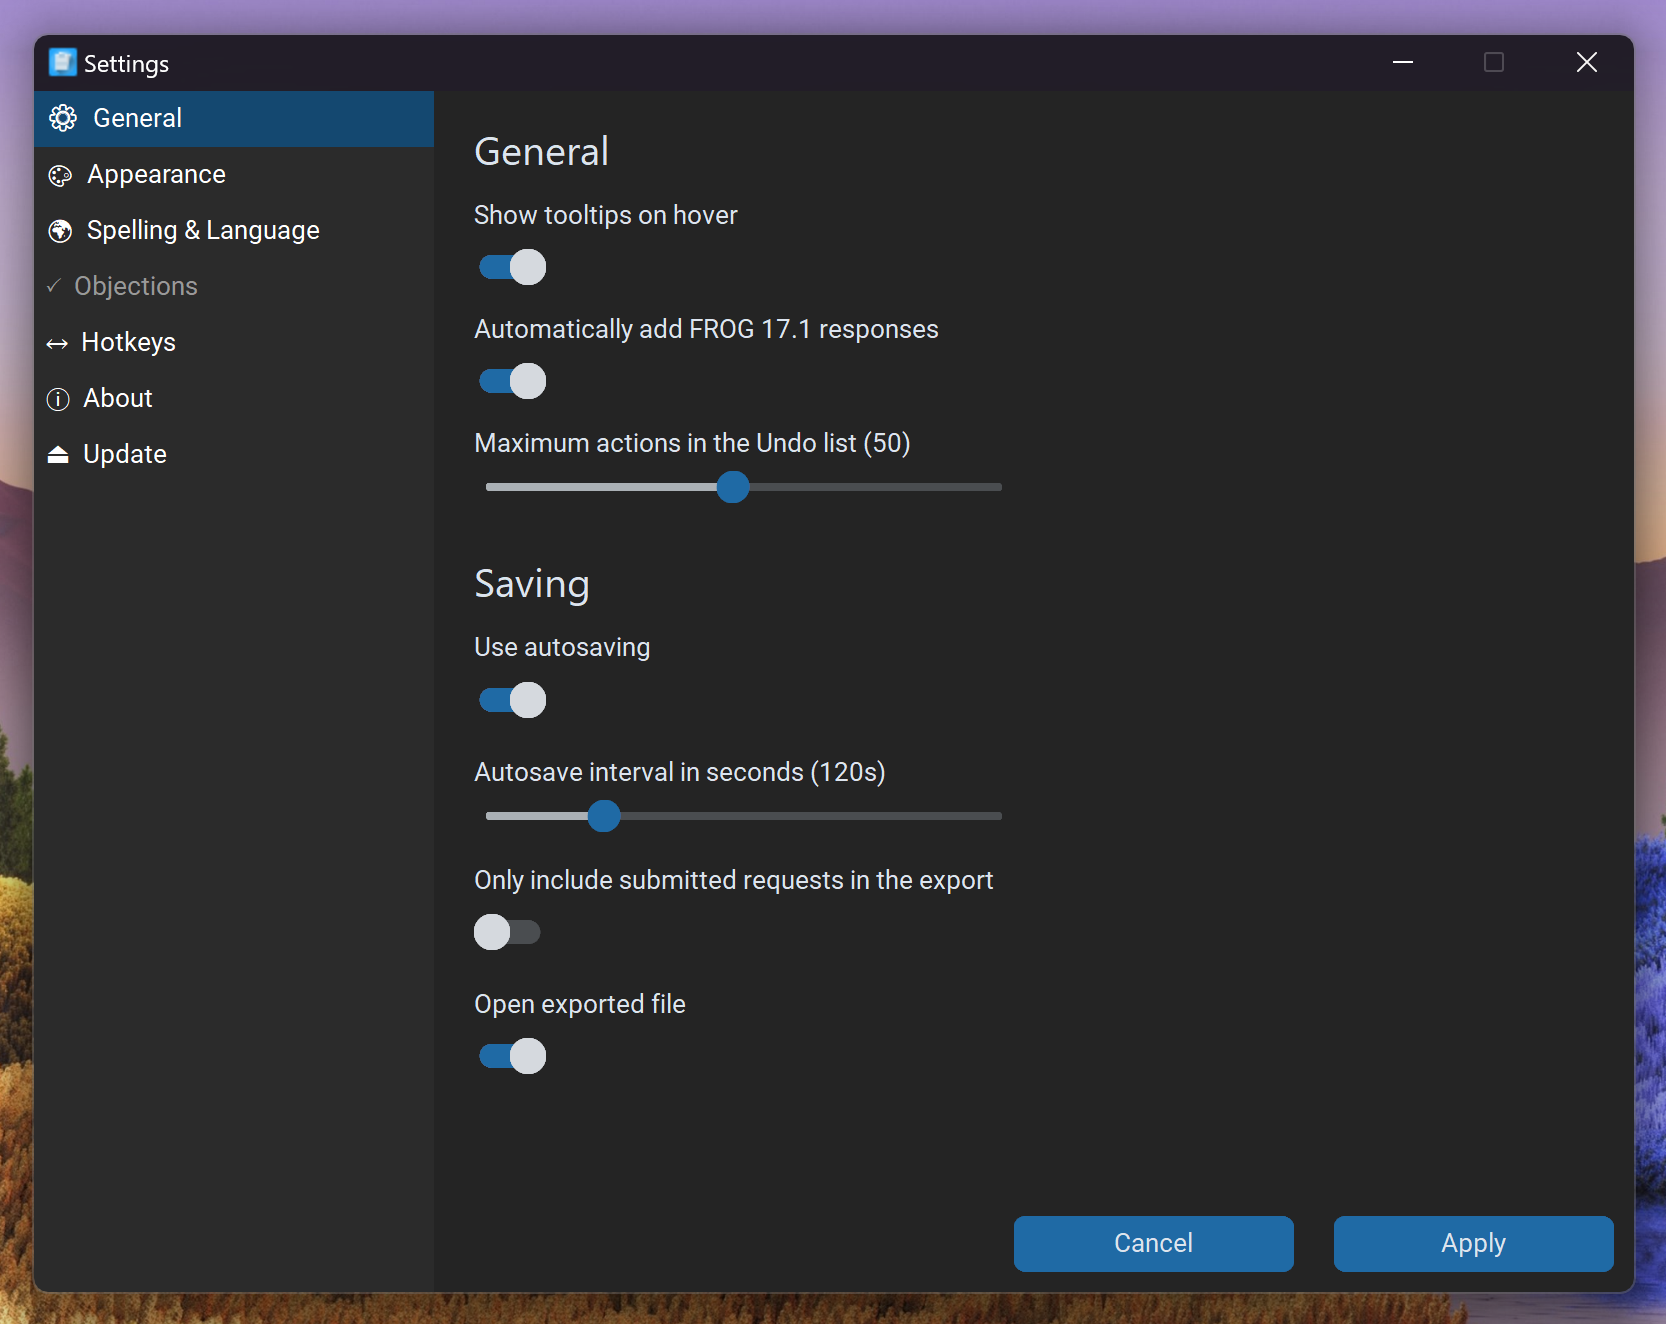
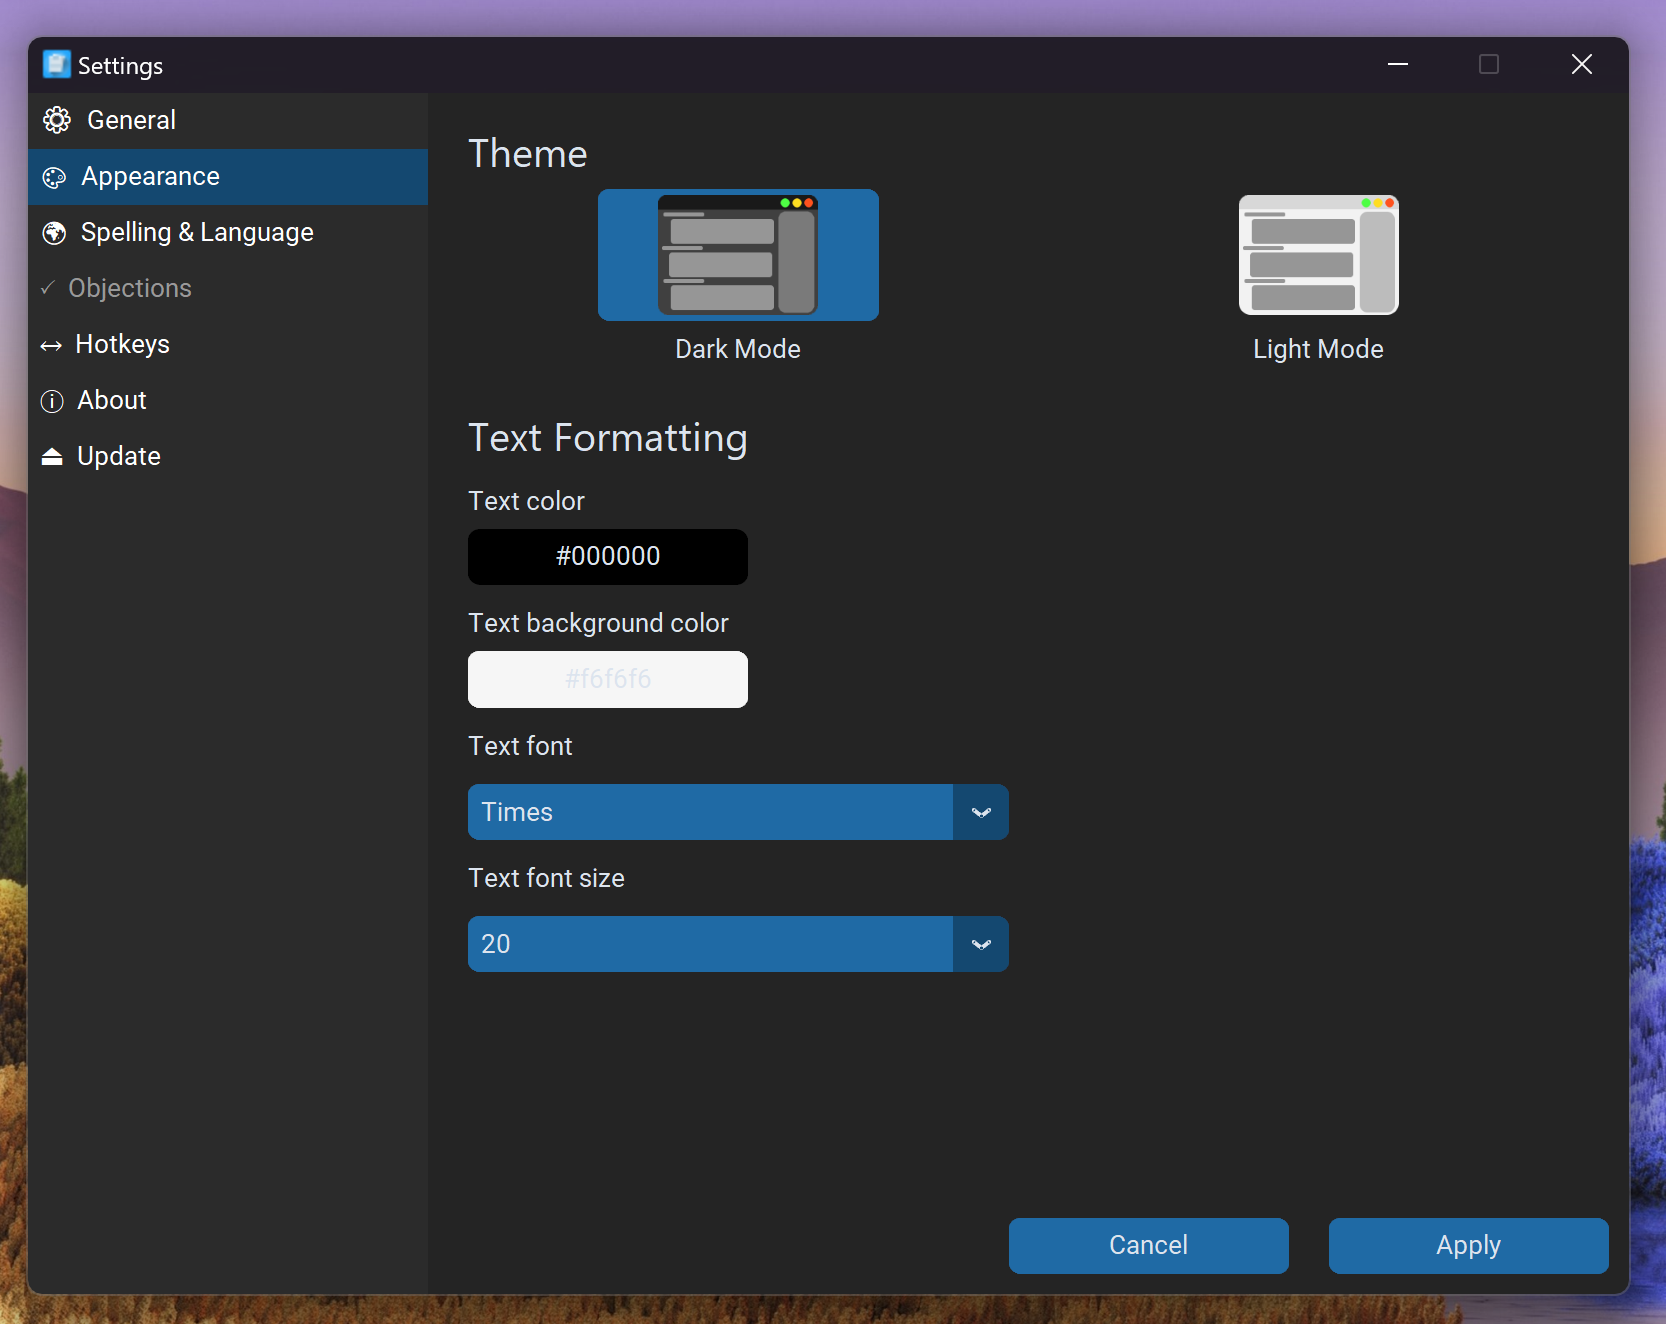
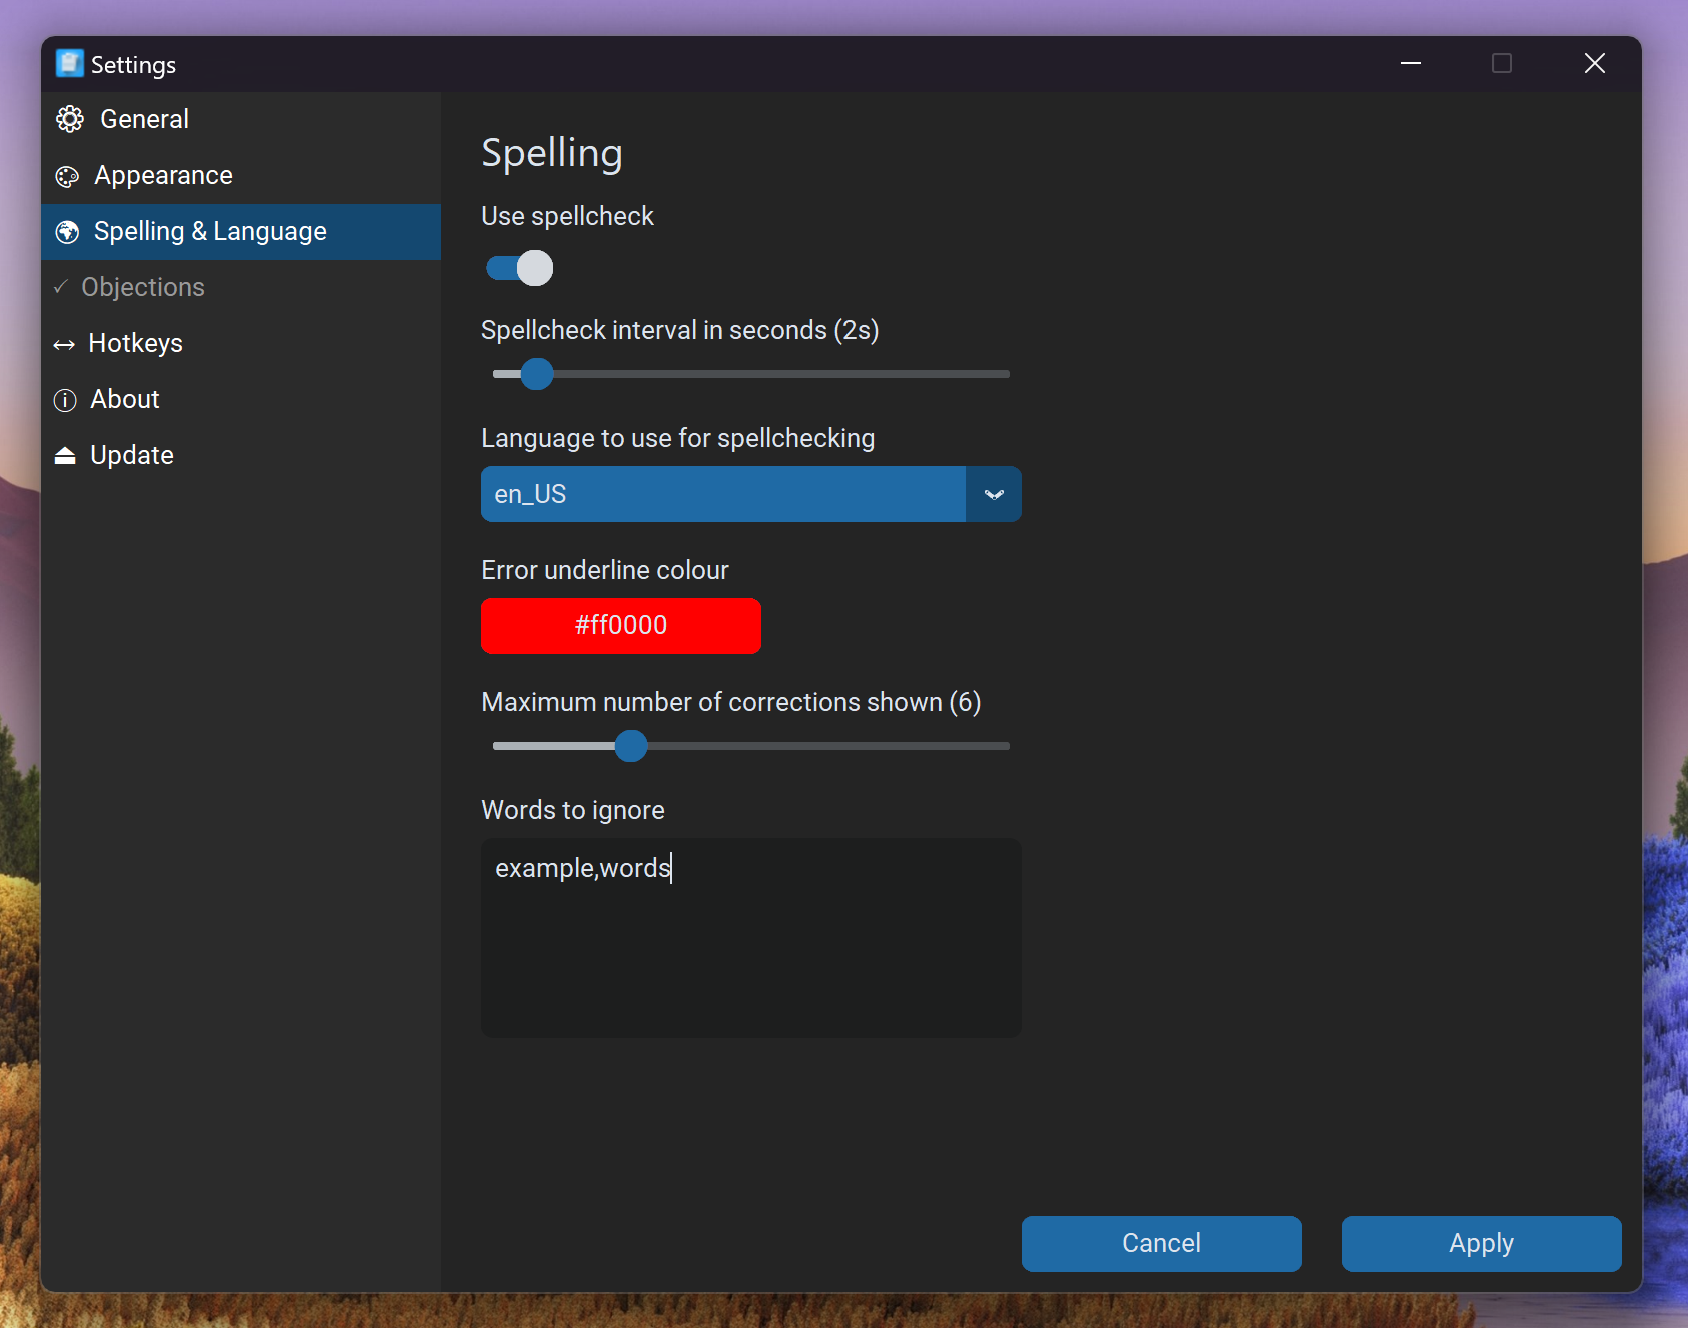
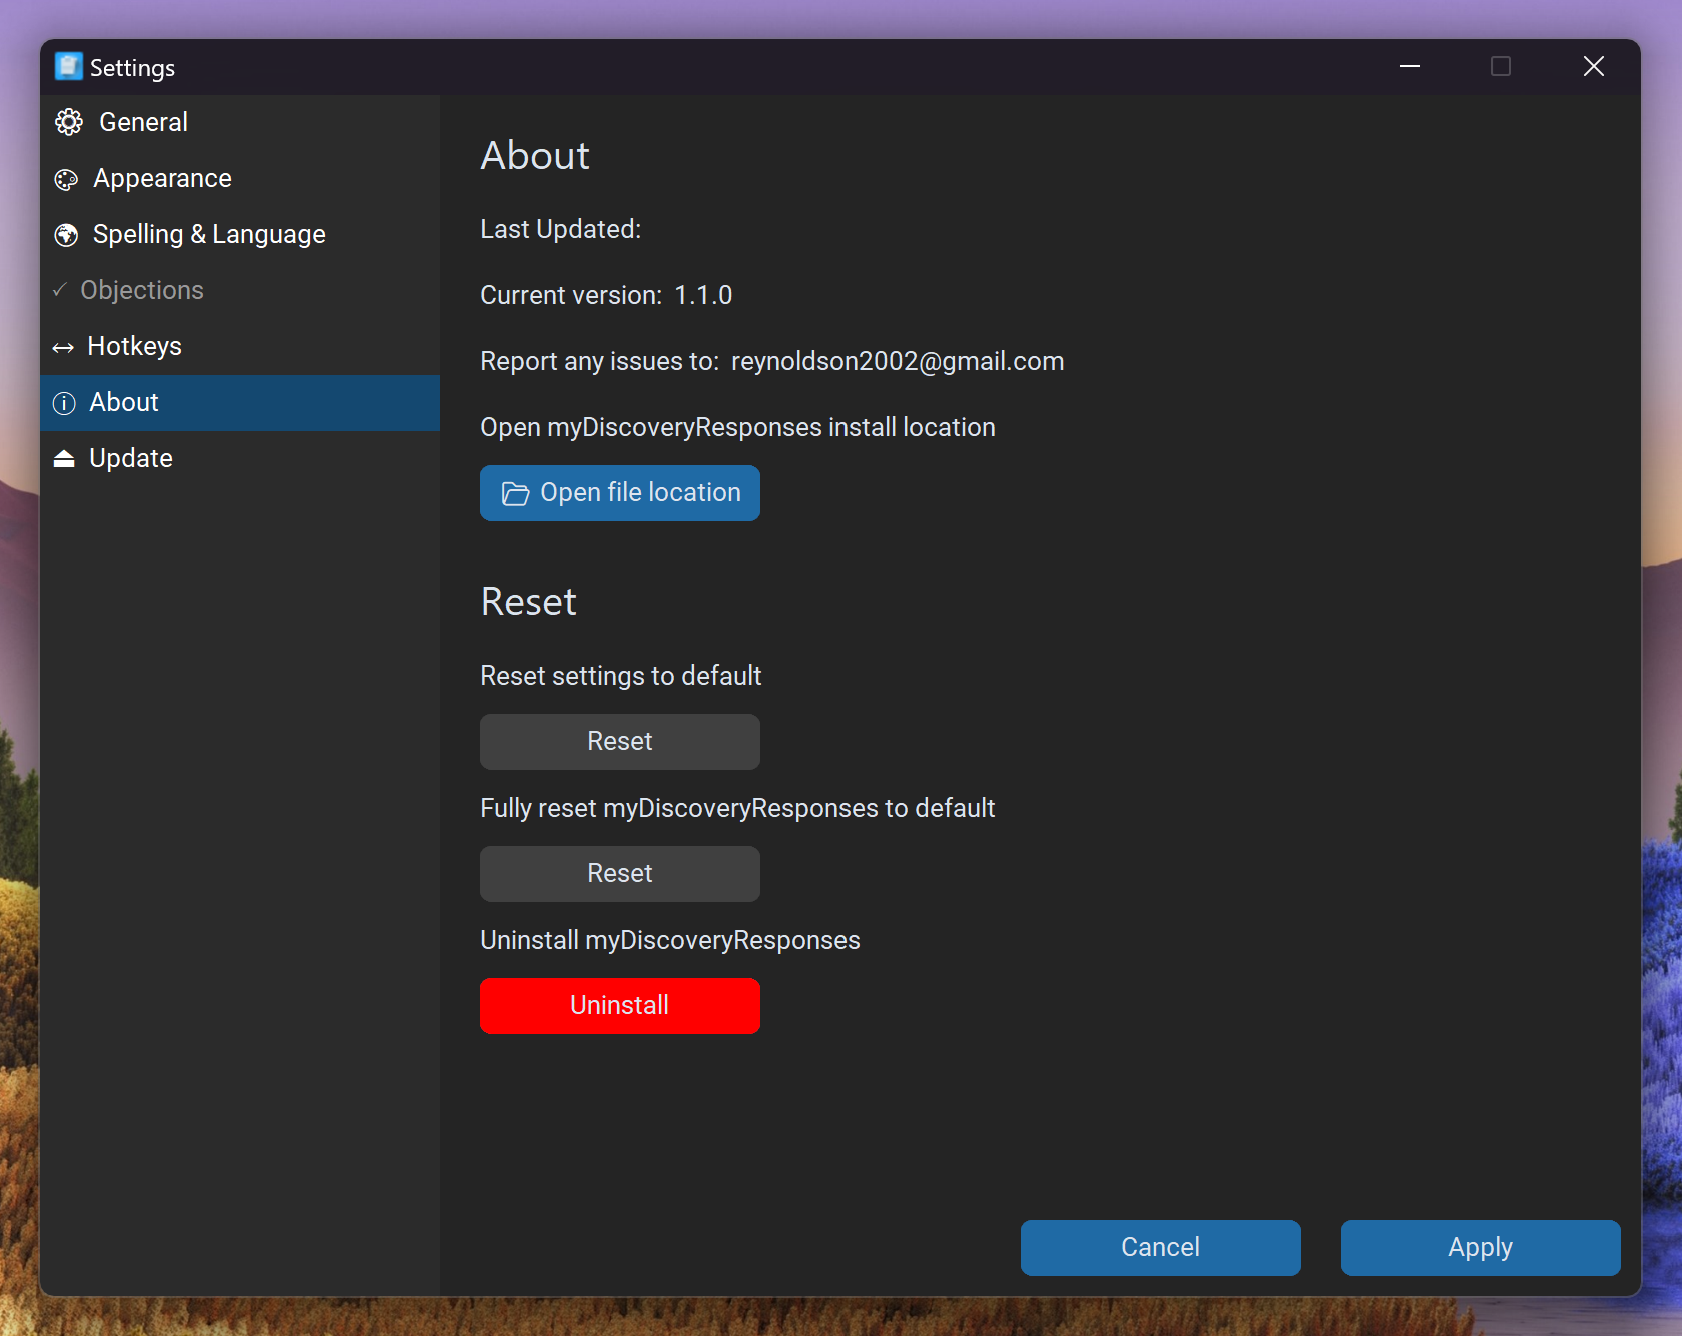
Settings
There is a wide range of settings within the software, most of them are inutitive so they are not explained further in this guide.
Examples